Let’s begin with the items you will need/I like to use:
- Foundation in your shade, foundation or concealer a shade or two lighter than your skin, foundation a shade or two darker than your skin or a bronzer of your choice (Here I’ve used Graftobian foundations from my neutral undertone palette)
- Iridescent highlight that suits your skin tone (On Ajay I’ve used Benefit Sunbeam, but if you are cool toned try Benefit Highbeam instead)
- Makeup setting spray (I’ve used Mac Fix +)
- Dense synthetic foundation brush (I really like the Sigma Round Kabuki F82, Urban Decay Optical Blurring brush is another good option)

Next, apply your foundation shade all over your face, blending down into your neck and up into your hairline. Then, locate your cheekbones. Use your fingers to feel from your under eye moving down, until you reach a bone that is sticking out, that will be it. Now, locate the hollows of your cheeks by creating a fishy face and lining up your brush from your pouty lips up to your ear.
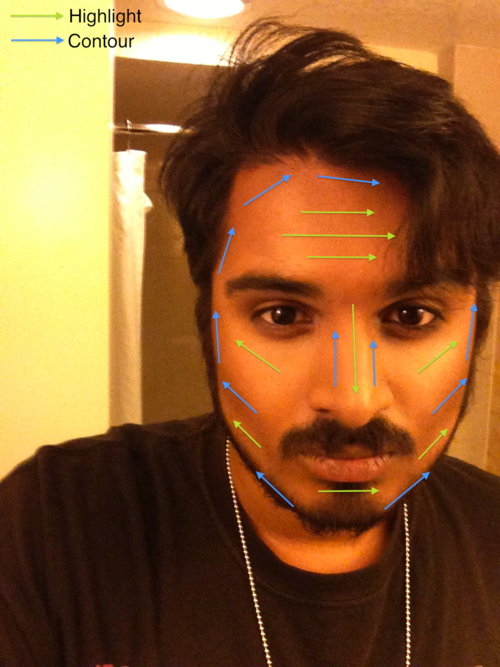
Now the important part, where to place the lighter and darker shades. Start by taking your highlight shade and place unblended lines (start with less product then repeat if necessary) across the center of your forehead, down the bridge of the nose, across the cheekbones, the center of your chin, and in the space between the hollow of your cheeks and your jawline. Blend each portion starting in the center and fade out slowly. Use a light hand and move the brush in small circles, it will do all the work for you. Focus on blending the highlight seamlessly into your original foundation shade at the edges. The reason I like to put down a shade matching my skin is that it’s easier to blend 2 shades down, rather than 4 shades down (which is the difference between your highlight and contour).
Next, create a stripe with your contour color in the hollow of your cheek, focusing the product in the center of the hollow. Follow the side of your face up along the hairline. You’ll basically make a C-shape with your contour stripes. Make another set of stripes, with less product than in the hollows along the jawline. Just like before, focus on blending out the edges using light circular motions. Bring the top of the cheek hollow contour up at a diagonal to connect with the hairline, making a slight triangle. Blend the base of the cheek hollow contour until you get a nice gradation to your skin tone For your nose, just take some bronzer on your finger and lightly pat it on the edges of the bridge. Alternatively, a fluffy brush is also good for a subtle application.
For those of you who are more visual, I’ve created a diagram on Ajay here:
If you have trouble blending, try different kinds of products. I personally find that creams are easier to blend than liquids because they don’t set as quickly. If you use a liquid foundation, consider spritzing your brush with some water to prolong the time you have to blend the colors together. A dense brush will help you buff the products into your skin and allow for seamless blending. If you apply too much product at any point, just go back with your original foundation color and pat in a little bit over top to lessen the effect. Alternatively, if your big brush makes your bronzer fade away, go back with a small fluffy brush and add more product in the center of your contour.
Once you’ve got that done, just apply the iridescent highlight along your cheekbones and down the center of your nose and spritz your face with the setting spray as a final touch.
Wha-la! Transformed facial structure and glowing radiant skin.

Isn’t he handsome?
No comments:
Post a Comment